
blog · Artikel auf Englisch
Setting up your first model, step by step
Snotra brings no model of its own: you connect the one you want. This guide walks through both ways in, with a screenshot for every step — a local model with Ollama, free and without a key, and a cloud model with an API key.
Snotra is the agent, not the model. It reads your folder, asks before it changes anything and keeps track of what happened — but the thinking is done by a language model you connect yourself. That can be a model running on your own machine or one from OpenAI, Anthropic or Google. Snotra has no account and no subscription of its own; you pay your provider directly, or nobody at all if the model is local.
So the first thing to do after installing is to connect a model. It takes a few minutes. Every screenshot below comes from Snotra 1.13.5, started with a fresh profile and a small example folder.
Step 1: Open the settings
The settings sit in the menu bar: Snotra AI › Settings… on macOS, View › Settings… on Windows and Linux, or Cmd+, / Ctrl+, from anywhere in the app. They open on Models.
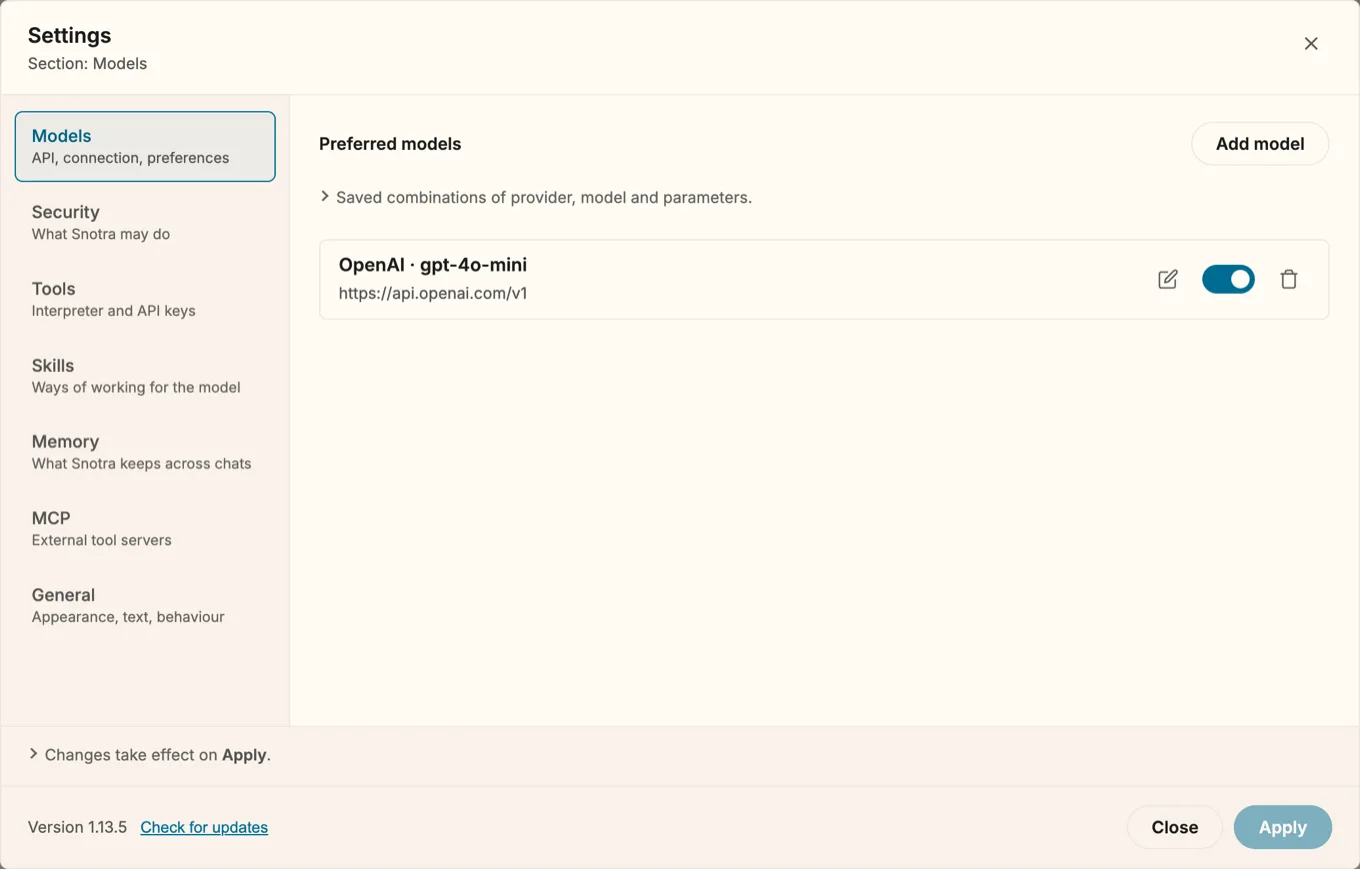
A fresh install already has one entry: OpenAI · gpt-4o-mini, without a key. Each entry on this list ties a provider to a model and its settings, and the switch decides whether it shows up in the chat's model menu. From here there are two ways on. If you have an OpenAI key, Step 2 is all you need. If you want to stay local, skip to Step 3.
Step 2: A cloud model with an API key
Click the pencil on the OpenAI entry. The dialog Edit model opens with the provider already fixed.
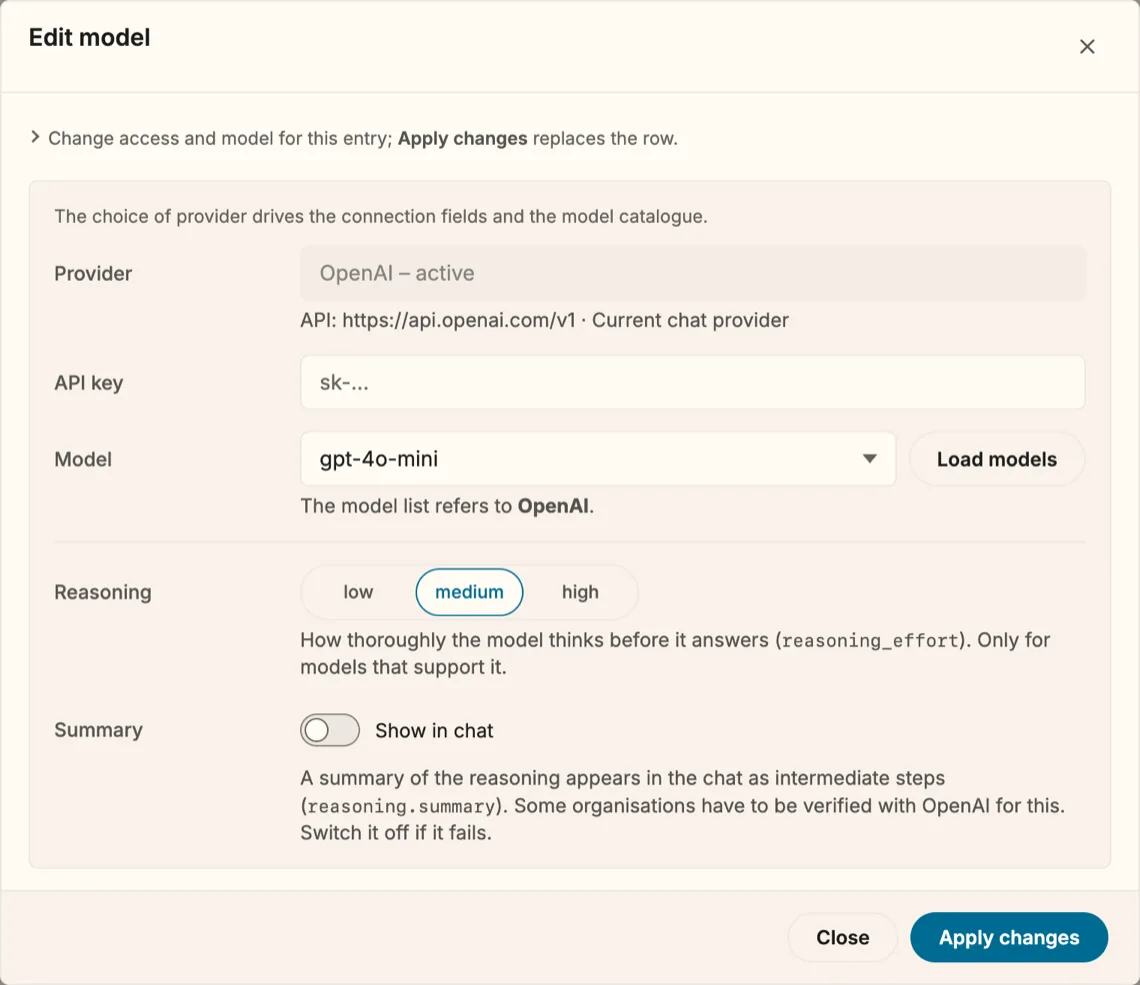
- Paste your key into API key. You create one in your provider's dashboard; for OpenAI that is the API keys page of the OpenAI platform.
- Click Load models to fetch the models your key can use, and pick one.
gpt-4o-miniis a cheap start; a larger model does better on longer tasks. - Leave Reasoning on medium unless you know you want more or less. It only matters for models that support it.
- Click Apply changes, then Apply at the bottom of the settings.
The key is stored encrypted in your operating system's user profile, never in your project folder, and it only ever goes to the address it was saved for. It isn't shown again after saving; leave the field empty later and the stored key stays.
Anthropic or Google instead? Click Add model, pick the provider at the top of the dialog and go on as above. Each of the three providers has one key, shared by all its entries.
That's it for the cloud. Carry on with Step 5.
Step 3: A local model with Ollama
A local model runs entirely on your computer: nothing leaves the machine, and it costs nothing per question. Ollama is the easiest way to get one. Install it, then fetch a model in a terminal:
ollama pull llama3.1Ollama now serves the model at http://localhost:11434. Back in Snotra's settings, click Add model and choose Ollama (local) as the provider. Ollama needs no key, which is why the list already calls it configured.
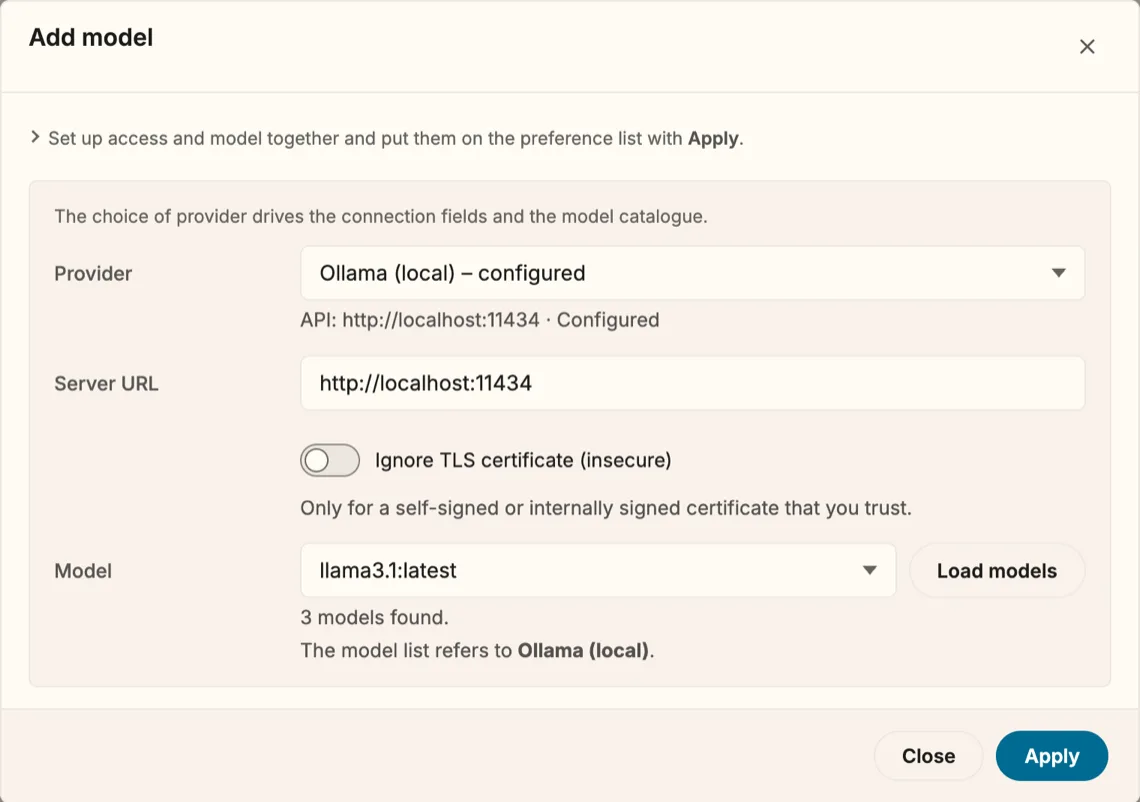
- Leave Server URL as it is. Only change it if Ollama runs on another machine.
- Click Load models. Snotra asks Ollama which models you have pulled, and the list fills.
- Pick the model and click Apply. The entry joins the list.
The other switch is for Ollama servers with a self-signed certificate inside a company network; at home you won't need it. LM Studio, llama.cpp, vLLM and gateways such as OpenRouter go through the provider OpenAI-compatible instead, with a template that fills in the address for you — the same steps otherwise.
Step 4: Remove the entry you don't use
Your list now has two entries: the OpenAI one from the fresh install and your new local model.
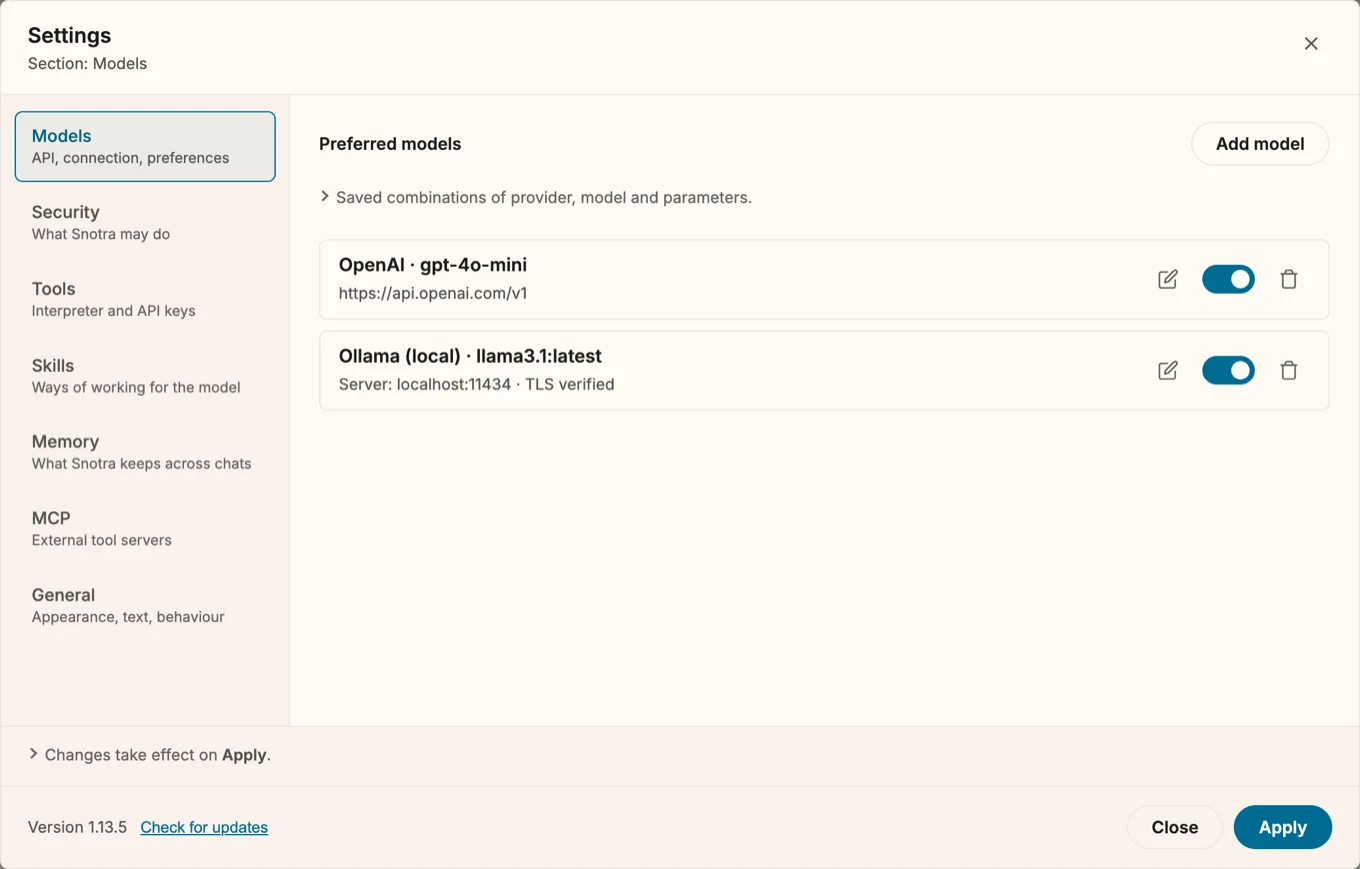
If you won't use OpenAI, remove its entry with the trash icon and click Apply. This step matters in 1.13.5: as long as the keyless OpenAI entry is the active one, the chat keeps asking you to set up a model and won't offer the new one. With it gone, your local model takes over. We are changing that, so a new model is usable right away (kkrafft1999/snotra#670). If you do have an OpenAI key, enter it as in Step 2 instead, and both entries stay available.
Step 5: Pick the model in the chat
Close the settings. Below the message field there is now a pill with the active model. Click it to switch between all entries whose switch is on.

The choice belongs to the conversation: a chat from the history comes back with the model it was held with, and a new chat starts with the one you picked last. So you can keep a local model for quick questions and a larger cloud model for the hard ones, side by side.
Step 6: Ask the first question
Open a folder if you haven't yet, and ask something about it.
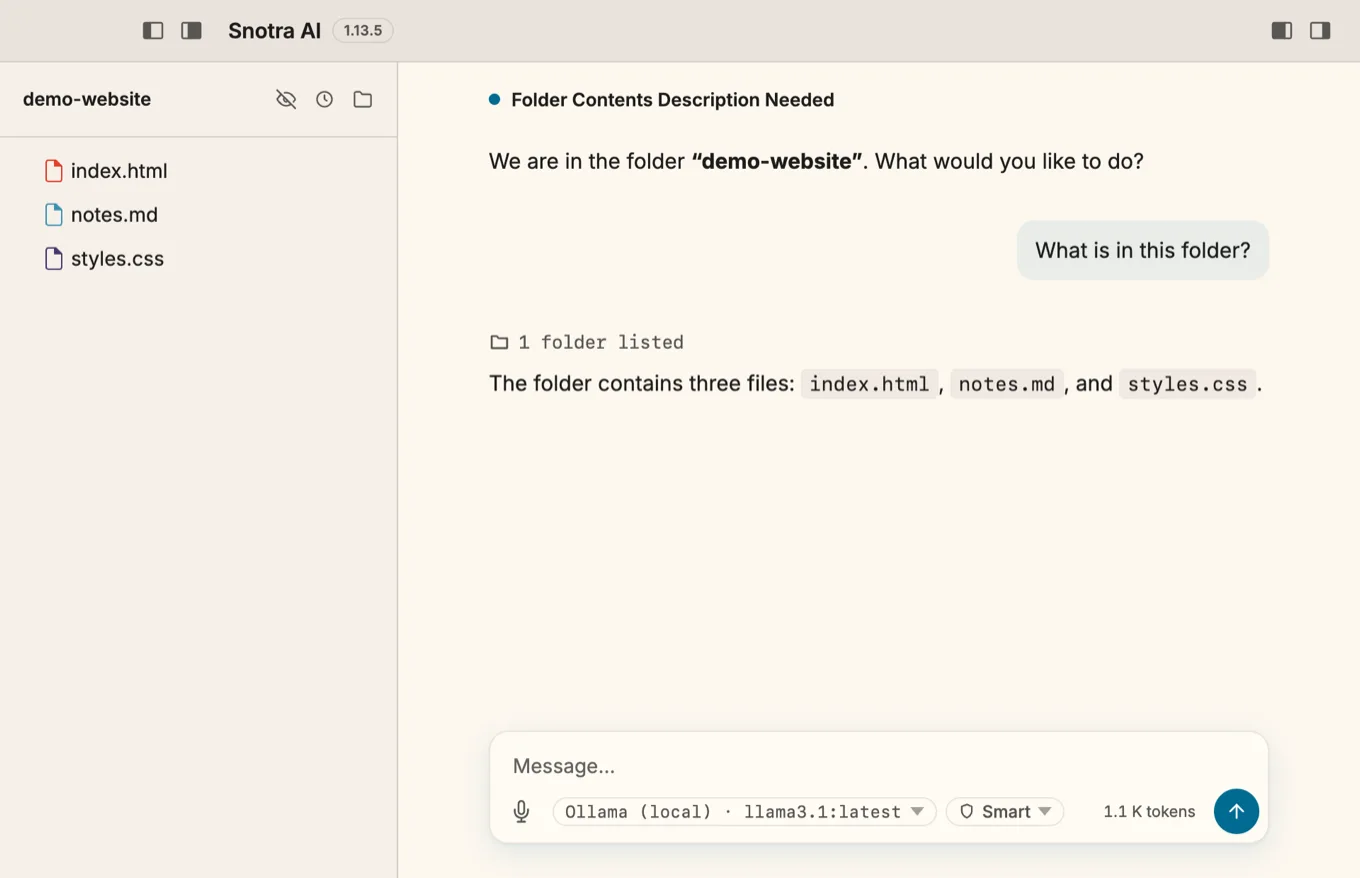
The model listed the folder with a tool, and the card above the answer says so. In the default mode, Smart, reading runs without asking; changing a file or reading a sensitive one asks first. What each mode allows is on one page, under Settings › Security — more on that in this article.
If something doesn't work
- “Load models” stays empty with Ollama. Ollama isn't running, or you haven't pulled a model yet.
ollama listin a terminal shows what is there. - The chat still asks you to set up a model. The active entry has no key — see Step 4.
- A local model gets lost in its tools. Small models differ a lot in how well they call tools. In the run for this article, llama3.1 (8B) answered “What is in this folder?” cleanly, but tangled itself up when asked to read a file. If that happens, try a larger model or one built for tool use, or give it one small step at a time. Why local models need a harness that meets them halfway is the topic of this article.
- A cloud key is rejected. Check that it belongs to the provider of the entry, and that your account with that provider has billing set up.
Questions, or a provider that doesn't behave? The Discussions are open.